 Proteside
 API
Create and revoke the tokens that give access to the Proteside public API.
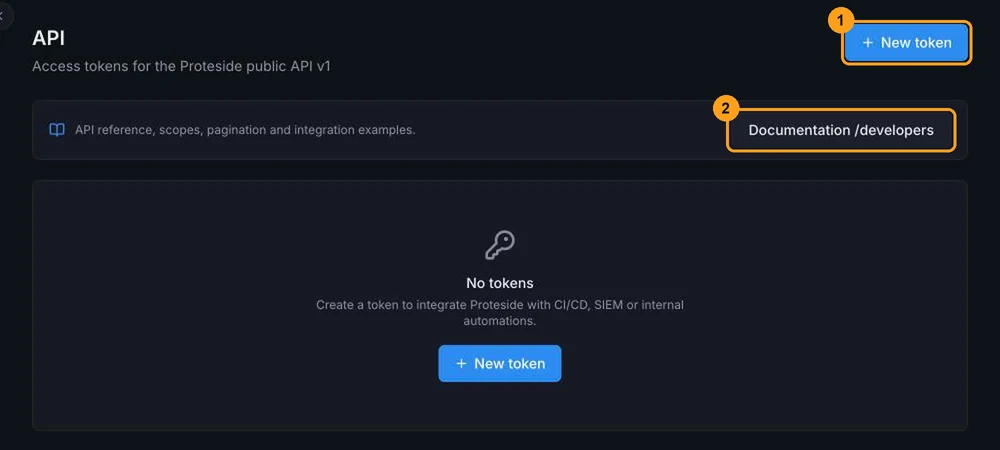
In Settings → API you create the tokens that external systems use to call the Proteside API: a CI/CD pipeline, a SIEM or an internal automation. The token belongs to the organization: it works for all of the organization's stores and keeps working even if the person who created it leaves the team.
Who can manage tokens
Only the organization owner, the person who created the account, can create and revoke tokens. Other roles see the notice "Only the organization owner can manage tokens." instead of the list. If you need a token, ask the owner to create one with the scopes you need.
The token is created for the organization of the store selected in the store selector.
Create a token
Give it a name
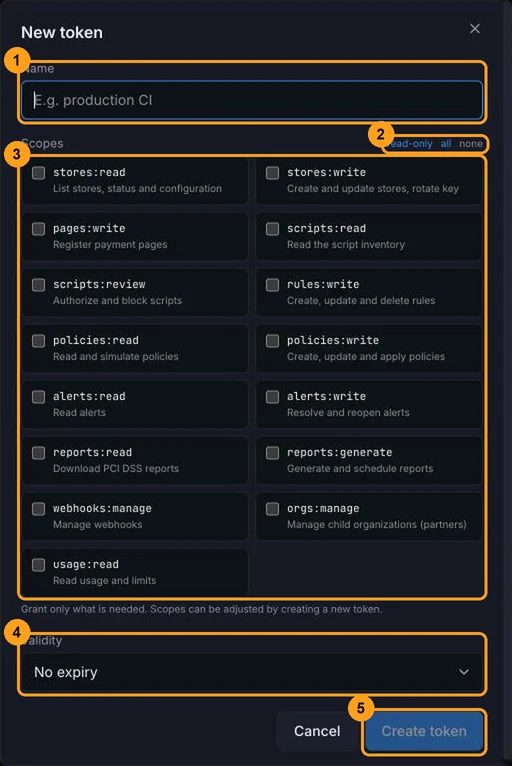
Fill in Name (1) with something that identifies the integration, for example "Production CI". Up to 80 characters. The name appears in the token list.
Choose the scopes
Scopes define what the token can do. Use the shortcuts (2):
- read-only: selects the read scopes for stores, scripts, policies, alerts, reports and usage;
- all: selects all 15 scopes;
- none: clears everything.
Then adjust the list (3), selecting only what you need. For example, an integration that only sends alerts to your
SIEM needs just alerts:read. What each scope allows is described in
Tokens and scopes.
Scopes can't be changed later. To change them, create a new token and revoke the old one.
Choose the validity
Under Validity (4), choose No expiry, 30 days, 90 days or 365 days. An expiry date forces you to rotate the token periodically, which reduces the risk if it leaks.
Create and copy
Click Create token (5). The Copy your token now window shows the full token, which starts with ps_live_.
Click Copy and store the token in a password manager or secrets vault before you click Done.
The token is shown only once
Proteside doesn't store the full token, only a fingerprint of it to check incoming calls. Once you close the window, there's no way to see the token again. If you lose it, create a new one and revoke the old one.
The token list
Each token shows Name, Prefix (the beginning of the token, so you can recognize it), Scopes, Last used, Expires and Status: Active, Expired or Revoked. Expired and revoked tokens stay in the list, grayed out, for the record.
Use the Last used column to find forgotten tokens: a token nobody has used in months can be revoked.
Revoke a token
Click Revoke on the token's row and confirm. The effect is immediate: integrations that use that token stop working on their next call. This can't be undone.
To replace a token without interrupting an integration, create the new one, update the integration, check under Last used that the old one is no longer being used, and only then revoke the old one.
API documentation
The Documentation /developers link (2) opens the dashboard's own technical reference, which is only in English. The same reference, with examples, is also in this documentation:
- Tokens and scopes: how to send the token and what each scope allows.
- Conventions: pagination, errors and rate limits.
- Webhooks: events sent by Proteside.