 Proteside
 Getting started
Choose a plan, create your account and store, install the snippet and do your first script review.
This walkthrough takes you from sign-up to a monitored store, with your first scripts reviewed. Set aside about 30 minutes, plus the time it takes to publish the snippet on your site.
If you received an invitation to someone else's store, you don't need to subscribe or create a store: see Accept an invitation.
Plans and trial
Prices are in Brazilian reais. The annual plan has a 20% discount and is billed once a year.
| Plan | Monthly | Stores (domains) | Users | History | PCI DSS Evidence | Payment page pageviews/month |
|---|---|---|---|---|---|---|
| Essential | R$ 97 | 1 | 1 | 30 days | no | 10,000 |
| Standard | R$ 197 | 2 | 3 | 90 days | yes | 50,000 |
| Growth | R$ 497 | 5 | 10 | 180 days | yes | 250,000 |
| Pro | R$ 997 | 20 | unlimited | 365 days | yes | 1,000,000 |
| Enterprise | on request | unlimited | unlimited | on request | yes | over 1 million |
- The 14-day trial is available only once per organization. Stripe asks for a credit card at the start of the trial and only charges it when the trial ends.
- Payment accepts credit cards only and promotional coupons.
- The PCI DSS Evidence screen is available from the Standard plan up. On Essential, it shows as locked with the View plans button.
- For Enterprise, click Falar com o time ("Talk to the team") and fill in the form. The sales team replies by email.
The trial asks for a card and only works once
The sign-up screen says "No credit card commitment", but Stripe checkout asks for the card even for the trial. If your organization has already used the trial, the button still says Começar trial grátis ("Start free trial"), but the first charge happens right away. To cancel before the trial ends, use My Subscription in the user menu.
Create your account and store
Open the sign-up
Sign-up starts on the Proteside website, when you choose a plan. You land on the Create your account screen with the Selected plan card already filled in. The sign-in screen has no link to create an account.
Fill in your details
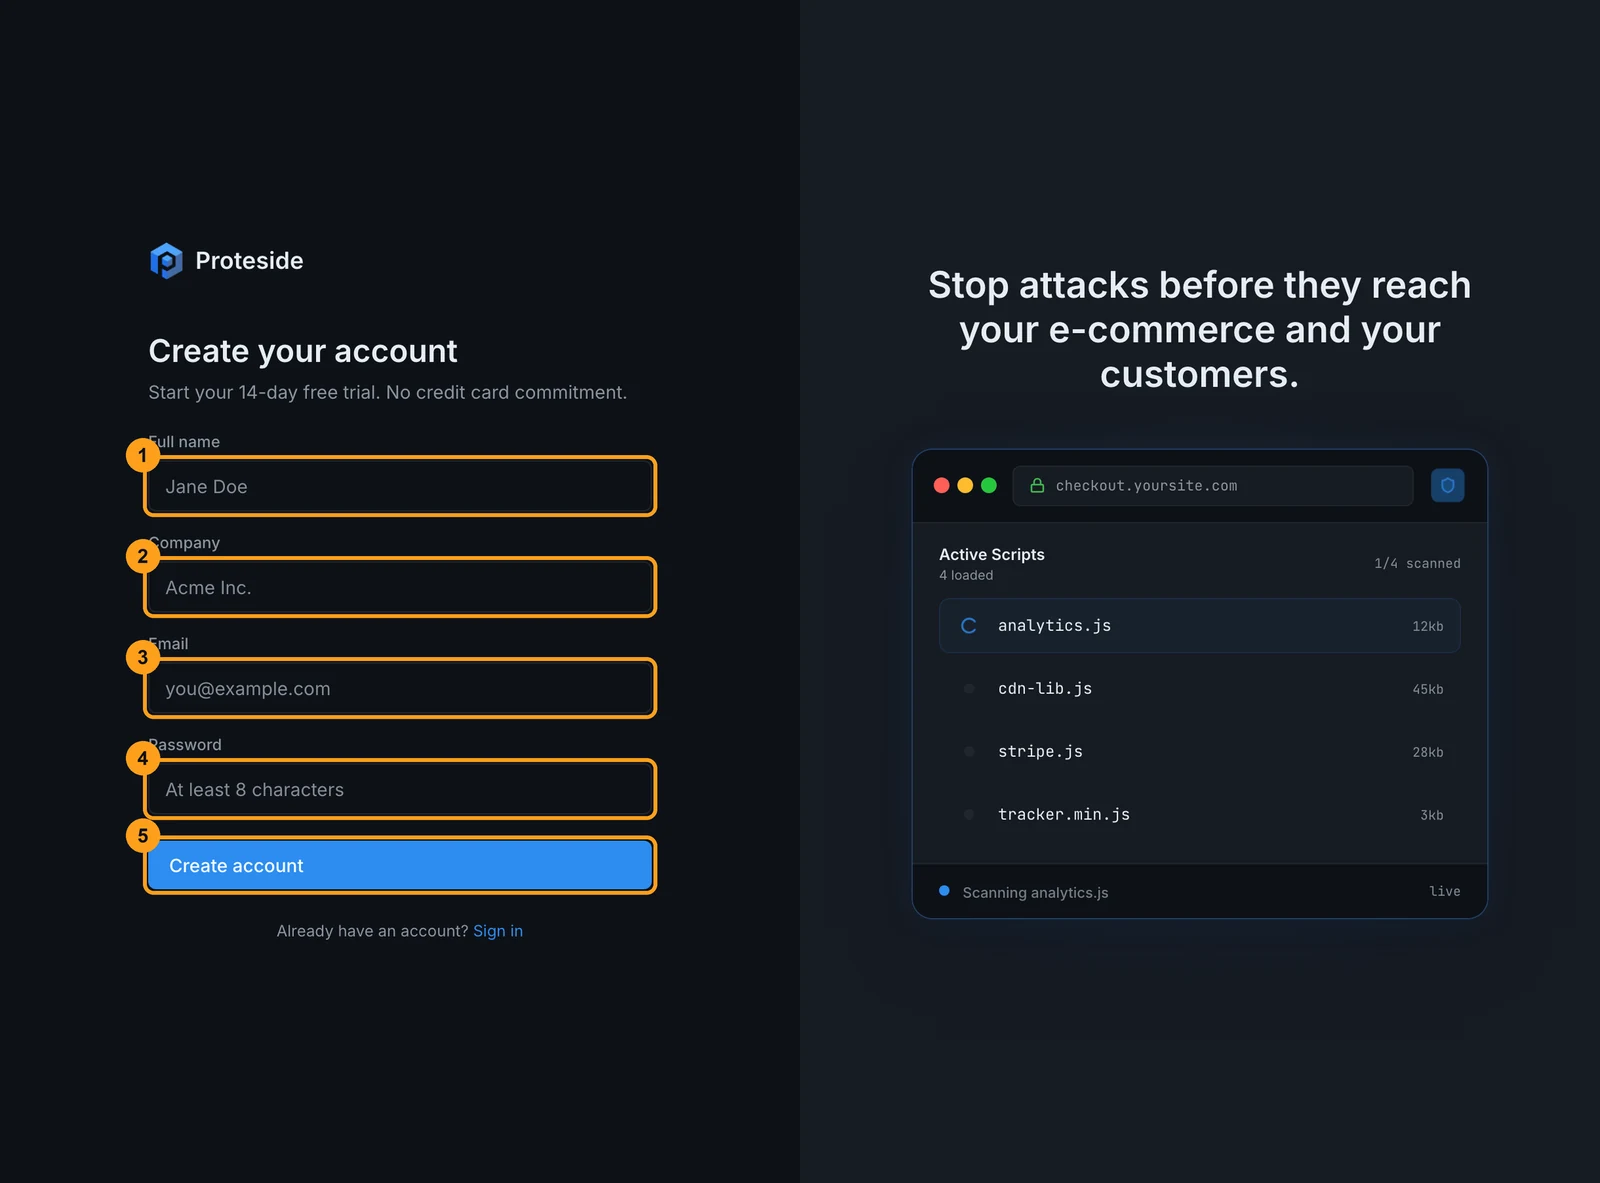
Enter your Full name (1) and Company (2), which becomes the organization's name. Then enter your Email (3) and a Password (4) with at least 8 characters. Click Create account (5).
If you see "Account created. Please check your inbox to confirm your email and continue.", open the email, confirm your address and sign in with your password.
If you land on No active store access after confirming your email
When sign-up asks for email confirmation, the organization isn't created automatically. If, after confirming and signing in, you see the No active store access screen, click Contact support to finish setting up your account. Don't try to subscribe again from that screen: payment fails with the message "Organization not found".
Choose the plan and billing period
If you came from the website with a plan already chosen, sign-up takes you straight to payment. If not, the Escolha seu plano ("Choose your plan") screen appears.
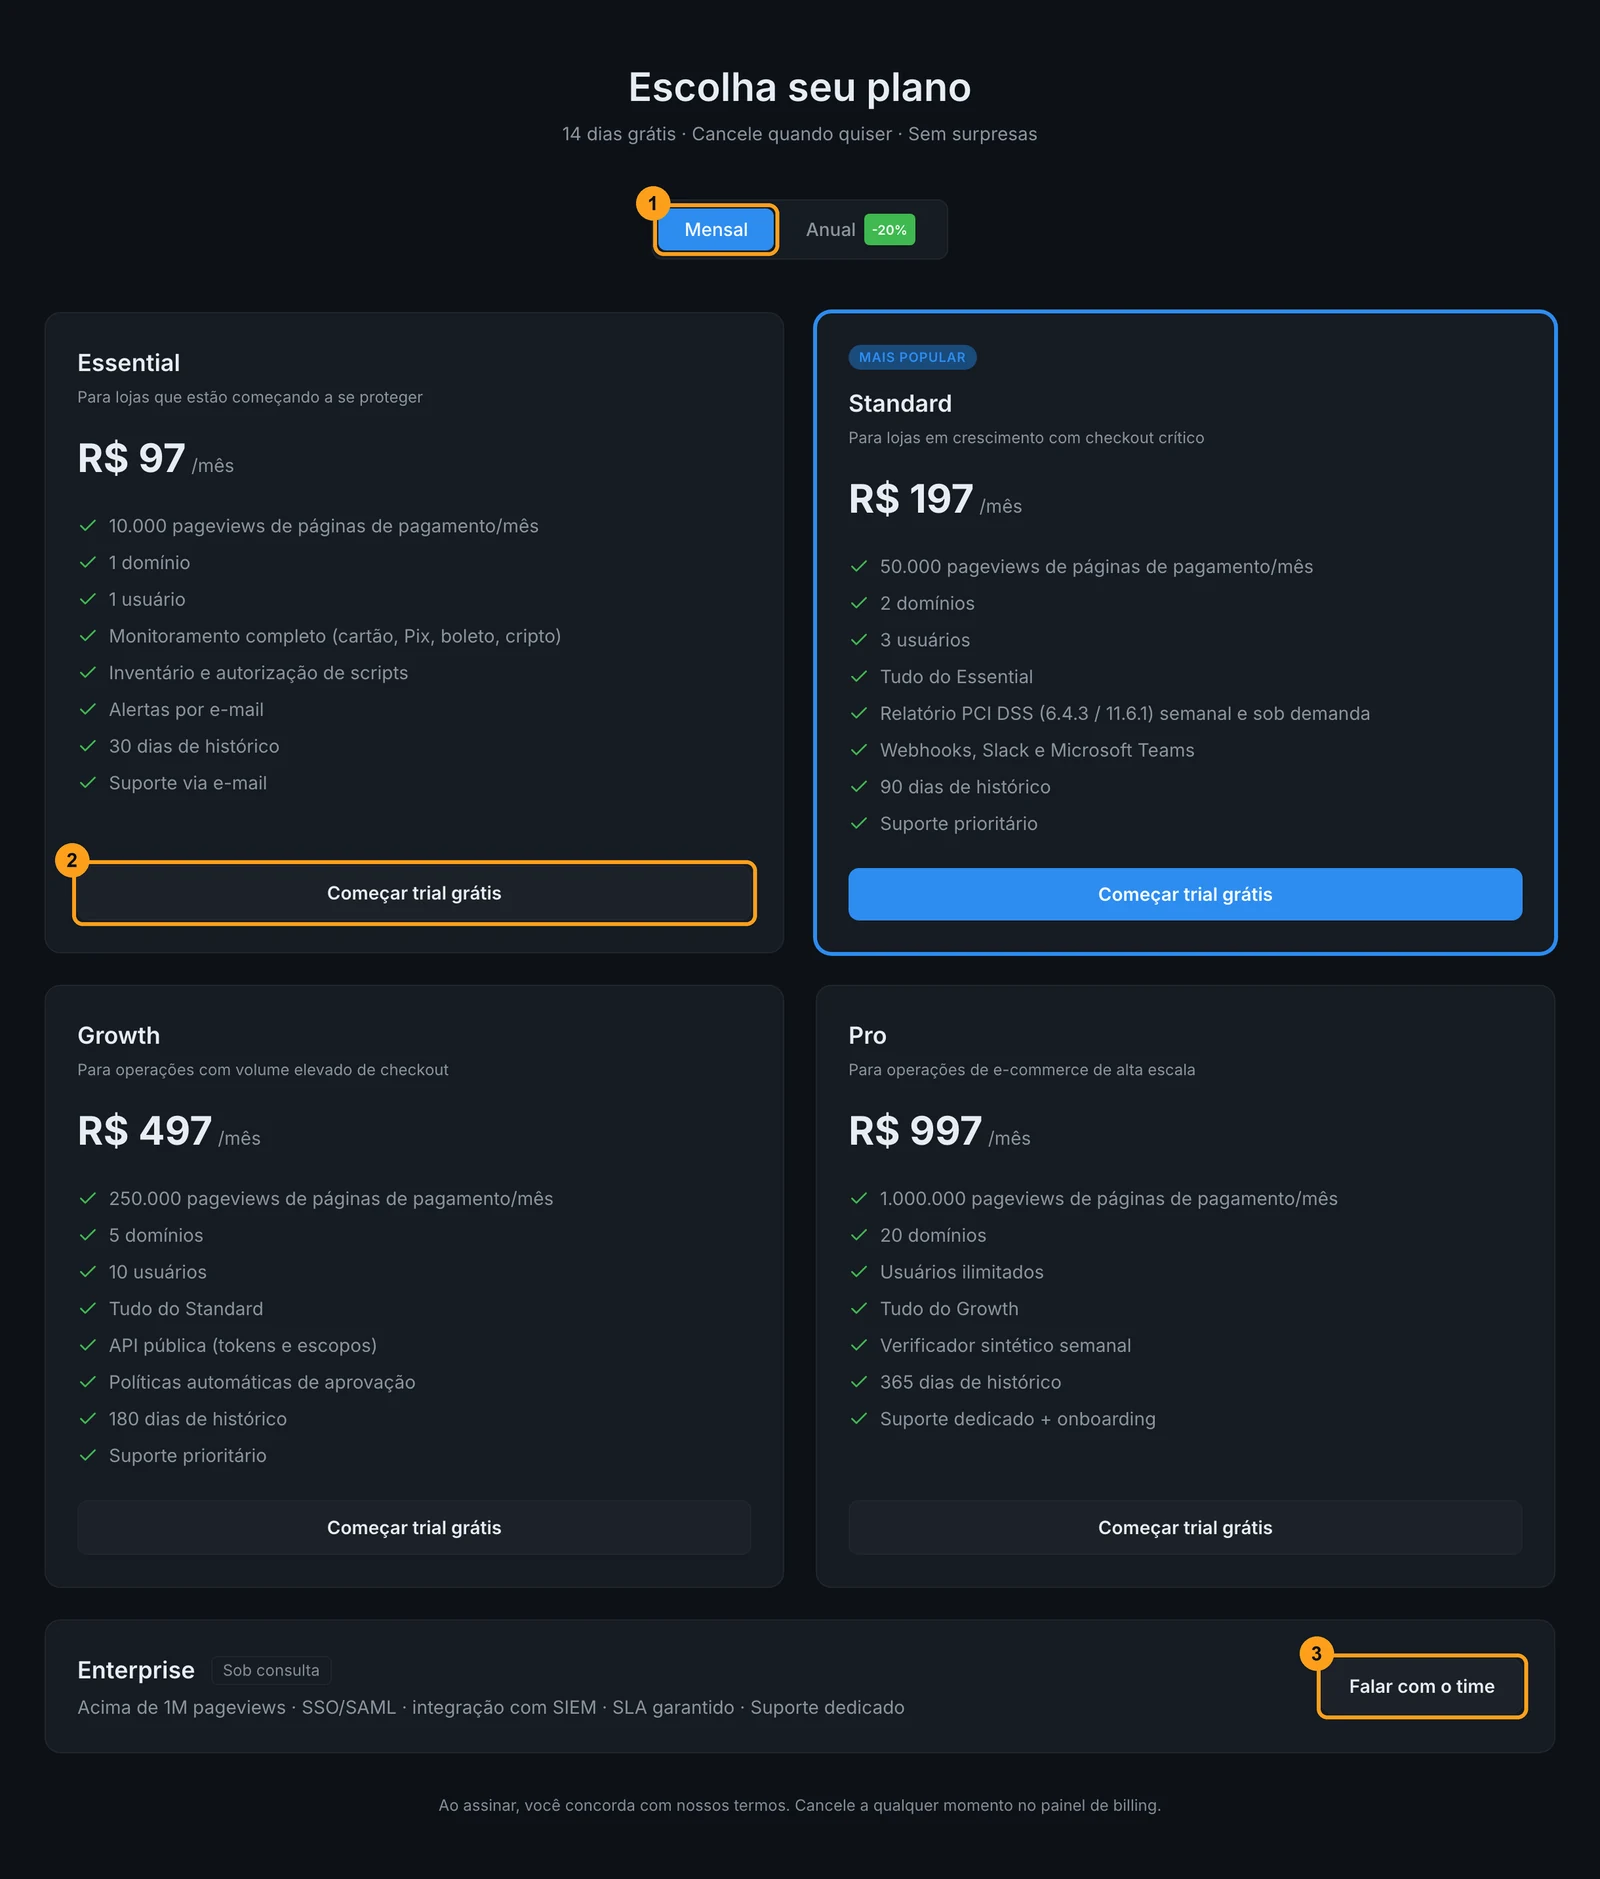
Choose Mensal ("Monthly") or Anual ("Annual") (1) and click Começar trial grátis ("Start free trial") (2) on the plan you want. For Enterprise, use Falar com o time ("Talk to the team") (3).
Enterprise form confirmation
The Enterprise form shows "Mensagem enviada" ("Message sent") even when sending fails. If you don't get a reply,
write to support@proteside.com.
Pay with Stripe
Payment happens on the Stripe page, in the dashboard's language. If you cancel, you go back to Escolha seu plano ("Choose your plan"). When you finish, the Payment confirmed screen appears and, within a few seconds, the store creation wizard.
Create the store in the wizard
The wizard has four steps, shown by the small bars at the top:
- Welcome to Proteside: click Get started.
- Your store: the store's details (see below).
- Install the SDK: the installation snippet, with HTML, Next.js, Nuxt and WordPress tabs and the Copy button.
- Your store is protected: click Go to dashboard.
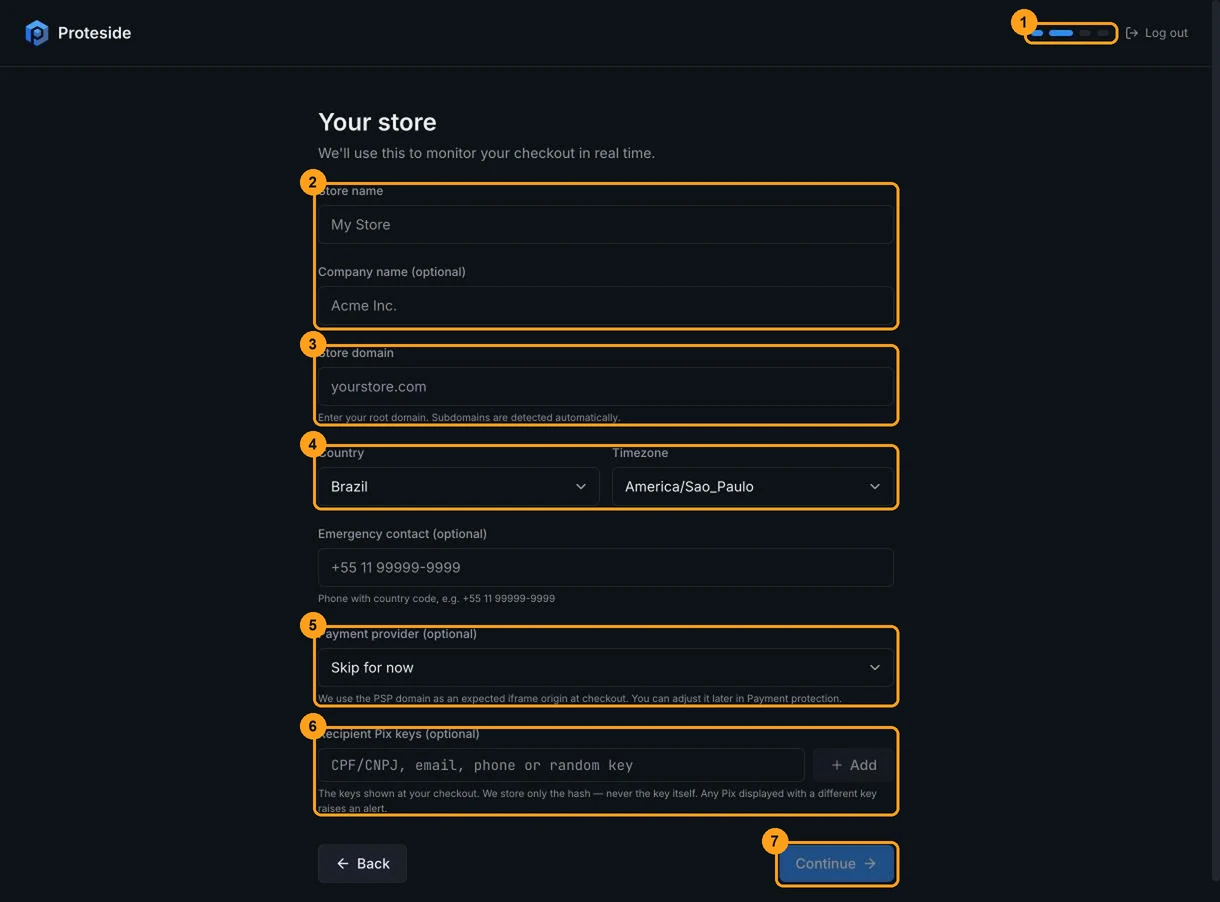
In the Your store step, the progress indicator (1) shows where you are. Fill in:
- Store name and Company name (optional) (2). If the organization already exists, the company name is ignored.
- Store domain (3): the root domain, such as
mystore.com. The wizard removeshttps://andwww.and shows how the domain will be saved. Each domain can only be registered once in Proteside. - Country and Timezone (4). The timezone sets the dates and the activity chart in the dashboard.
- Emergency contact (optional): a phone number with country code.
- Payment provider (optional) (5): your PSP. Its domain becomes an expected iframe origin in the checkout. You can adjust it later in Payment protection.
- Recipient Pix keys (optional) (6): the keys that appear in your checkout (CPF/CNPJ, email, phone or random key). Proteside stores only the hash. Any Pix displayed with a different key triggers an alert.
Click Continue (7).
Errors in this step appear in English
Invalid Pix key: one of the Pix keys has an invalid format, and the whole store isn't created. Remove the key and add it later in Payment protection.Domain "…" is already protected by another account.: the domain is already registered. If the store is yours, check the store selector before trying again.Store limit reached: your plan doesn't allow more stores.Too many requests: wait an hour and try again.
The wizard doesn't verify the installation
The last step says "Your store is protected" even if the snippet isn't on the site yet. The store is only protected after the snippet is published and the dashboard shows Proteside Active.
In the Install the SDK step, don't go back to Your store: when you continue again, the snippet shows the
example key pk_live_your_key_here, and your changes aren't saved. In any case, copy the snippet from
Settings → Pages & Domains, which has the right key and your rules.
When you create the store, Proteside sends a welcome email and creates the E-mail (padrão) ("Email (default)") notification channel, which sends high-severity alerts to your account's email.
Install the snippet
Copy the snippet from Settings → Pages & Domains and paste it as the first item in the <head> of every
checkout and payment page, before Google Tag Manager, Stripe.js and any other script. Publish the change.
The step-by-step for each platform is in Installing the snippet.
Confirm the SDK was detected
Open the checkout
Open the store's checkout page in your browser, as a customer would.
Check the indicator at the top
Reload the dashboard. The indicator at the top should change from Proteside not detected to Proteside Active. It turns green when there's been a real visit to the checkout with the SDK in the last 24 hours.
Check SDK Health
In SDK Health, check the domains with traffic and the events received. If the indicator stays red, follow Verify the installation.
Do your first script review
With the SDK active, the checkout's scripts start to show up in Scripts. A new script arrives as Needs review. The default policies, created with your account, already decide some of them on their own: they authorize the files from your site's build and the script of the PSP you entered in the wizard, and they block known threats.
Authorize your first-party scripts
If you see the notice about first-party scripts waiting for review, click Authorize all first-party and write a justification. These are the scripts served from your store's domain.
Apply the policy recommendations
Click View recommendations to see what the default policies suggest for known vendors, such as your PSP and analytics tools. See Approval policies.
Decide on the remaining scripts
For each remaining script, open its details and click Authorize, with a justification, or Block. See Scripts.